Ionic 4 + AppSync: Add Ionic pages and GraphQL queries - Part 3
In the previous post we set up a GraphQL backend with AWS AppSync. Now, we're going to create the Ionic app, which will use this backend. We're going to use Ionic components like: Cards, Slides, and Modals to implement the user interface for this app.
This tutorial is split up into these parts
Part 1 - Introduction to GraphQL & AWS AppSync
Part 2 - Create a GraphQL API
Part 3 - Add Ionic pages and GraphQL queries (this post)
Part 4 - Use GraphQL mutations in Ionic
Part 5 - Set up Authentication with Amazon Cognito
Part 6 - Add ElasticSearch to GraphQL API
Create Pages
We already created the Ionic app with the Ionic CLI in the previous post, so make sure you're in the root directory of the app.
$ cd quiz-appLet's go ahead and add the pages we're going to need for this app:
$ ionic g page cards
$ ionic g page card-details
$ ionic g page quiz
The 2 pages card-details and quiz will be loaded as Modals and since we're using Ionic with Angular, we need to make Angular aware about these pages. To do this, we'll need to add some configuration to src/app/app.module.ts. I've only included the relevant lines of code below.
import { QuizPage } from './quiz/quiz.page';
import { QuizPageModule } from './quiz/quiz.module';
import { CardDetailsPage } from './card-details/card-details.page';
import { CardDetailsPageModule } from './card-details/card-details.module';

@NgModule({
  declarations: [AppComponent],
  entryComponents: [QuizPage, CardDetailsPage],
  imports: [BrowserModule, IonicModule.forRoot(), AppRoutingModule, QuizPageModule, CardDetailsPageModule],
We're almost done setting up the pages, let's sprinkle in some global styling for some Ionic components we're going to use. Add the following code to src/theme/variables.scss:
--ion-background-color: #0cd1e8;
--ion-item-background: #ffffff;
Install Amplify library
Install the aws-amplify library. We'll be using its GraphQL client to handle GraphQL requests and responses:
$ npm install -s aws-amplifyInitialize Amplify by adding the following lines to src/main.ts:
import API from "@aws-amplify/api";
import PubSub from "@aws-amplify/PubSub";
import awsConfig from "./aws-exports.js";

PubSub.configure(awsConfig);
API.configure(awsConfig);
The file src/aws-exports.js was generated when we created the GraphQL API in the previous part of this tutorial. It contains all the settings we need to connect to the GraphQL endpoint.
Amplify relies on the global and process objects to be defined, so to prevent errors, add the following code to src/polyfills.ts
(window as any).global = window;

(window as any).process = {
  env: { DEBUG: undefined }
};
Home Page
We already have a page in the app generated by default: the home page. Go to src/pages/home/home.page.html and copy in the following code:
<ion-header no-border>
  <ion-toolbar color="secondary">
    <ion-title>
      Quiz App
    </ion-title>
  </ion-toolbar>
</ion-header>

<ion-content text-center>
  <ion-card (click)="showCards(deck)" *ngFor="let deck of decks">
    <ion-card-header>
      <ion-card-title>{{ deck.name }}</ion-card-title>
    </ion-card-header>
  </ion-card>
</ion-content>

<ion-footer no-border>
  <ion-toolbar color="secondary" text-center>
    <ion-button fill="outline" color="light" (click)="startQuiz()">
      Quiz Me
      <ion-icon slot="end" name="albums"></ion-icon>
    </ion-button>
  </ion-toolbar>
</ion-footer>
Our page consists of a header with a title, a list of cards to display our decks and a footer with a button, which will start the quiz.
We need to add behaviour to this page to load the decks and to respond to clicks on the decks and on the quiz button. Go to src/pages/home/home.page.ts and copy in the following code:
import { Component } from "@angular/core";
import { ModalController } from "@ionic/angular";
import { Router } from "@angular/router";
import { QuizPage } from "../quiz/quiz.page";

import Amplify, { API, graphqlOperation } from "aws-amplify";

const listDeckNames = `
query listDeckNames {
  listDecks {
    items {
      id
      name
    }
  }
}
`;

@Component({
  selector: "app-home",
  templateUrl: "home.page.html",
  styleUrls: ["home.page.scss"]
})
export class HomePage {
  public decks;

  constructor(
    private modalController: ModalController,
    private router: Router
  ) {}

  ngOnInit() {
    const query = API.graphql(graphqlOperation(listDeckNames)) as Promise<any>;

    query.then(res => {
      this.decks = res.data.listDecks.items;
    });
  }

  showCards(deck) {
    this.router.navigate(["/cards", deck.id]);
  }

  async startQuiz() {
    const modal = await this.modalController.create({
      component: QuizPage
    });
    return await modal.present();
  }
}
On the top you can see the GraphQL query listDeckNames for this page to get all the decks with their id's and name. As you can see I'm only requesting the information we actually need for this specific page.
The Amplify API.graphQL function is called to send our GraphQL query to AppSync.
We're using Angular Router to navigate to the Cards page and we're using Ionic ModalController to load the Quiz page.
Run the app now with ionic serve to see if the page is working as expected.
$ ionic serve --labThis command will compile the code and load the app in a browser. The --lab flag allows you to view the layout for Android, iOS and Windows side-by-side.
Generated code
Instead of writing the GraphQL queries yourself, you can also use the generated queries, located under src/graphql/. These were generated when we created the API in the previous part but I wanted more control over the data that was returned, so I'm defining the queries myself per page.
We selected typescript as the language for the codegen, so the CLI also generated the file src/API.ts.
This file contains types based on the GraphQL schema so you can use these types in your TypeScript code.
Check out the Amplify Docs for more info.
Cards Page
Make sure you change the routing setup for the Cards page to include the Deck id in the navigation, change the following line in src/app/app-routing.module.ts.
{ path: 'cards/:id', loadChildren: './cards/cards.module#CardsPageModule' },Let's go to the Cards page and add the code for it, go to src/pages/cards/cards.page.html and copy in the following code:
<ion-header no-border>
  <ion-toolbar color="secondary">
    <ion-back-button color="light"></ion-back-button>
    <ion-title>{{ deck?.name }}</ion-title>
    <ion-buttons slot="end">
      <ion-button (click)="showNewCard()">
        <ion-icon slot="icon-only" name="add"></ion-icon>
      </ion-button>
    </ion-buttons>
  </ion-toolbar>
</ion-header>

<ion-content>
  <ion-card *ngFor="let card of deck?.cards.items" (click)="showCard(card)">
    <ion-card-content>
      {{ card.question }}
    </ion-card-content>
  </ion-card>
</ion-content>
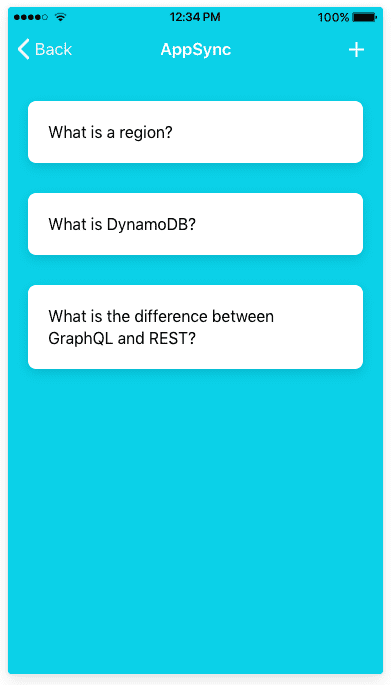
This page displays a list of questions, when you click on a question the Card Details page will be shown. We also have a button in the header to add cards.
Go to src/pages/cards/cards.page.ts and copy in the following code:
import { Component, OnInit } from "@angular/core";
import { ActivatedRoute } from "@angular/router";
import { ModalController } from "@ionic/angular";
import { CardDetailsPage } from "../card-details/card-details.page";
import { API, graphqlOperation } from "aws-amplify";

const listQuestions = `
query listQuestions($id: ID!) {
  getDeck(id: $id) {
    name
    cards {
      items {
        id
        question
      }
    }
  }
}
`;

@Component({
  selector: "app-cards",
  templateUrl: "./cards.page.html",
  styleUrls: ["./cards.page.scss"]
})
export class CardsPage implements OnInit {
  public deckId;
  public deck;

  constructor(
    private modalController: ModalController,
    private route: ActivatedRoute
  ) {}

  ngOnInit() {
    this.route.params.subscribe(p => {
      this.deckId = p.id;
      this.getQuestions();
    });
  }

  getQuestions() {
    const query = API.graphql(
      graphqlOperation(listQuestions, { id: this.deckId })
    ) as Promise<any>;

    query.then(res => {
      this.deck = res.data.getDeck;
    });
  }

  async showCard(card) {
    return this.loadModal(card);
  }

  async showNewCard() {
    return this.loadModal(null);
  }

  async loadModal(card) {
    const modal = await this.modalController.create({
      component: CardDetailsPage,
      componentProps: {
        card: card,
        deck: { id: this.deck.id, name: this.deck.name }
      }
    });
    return await modal.present();
  }
}
We get the id of the deck from the route parameters and then execute the listQuestions GraphQL query to get all the data we need to display on the page.
We're not displaying the answers here, so our GraphQL query is not asking for the answer field. We'll have to get the answer on the Card Details page which will be displayed as a Modal when a question is selected.
Card Details Page
Go to src/pages/card-details/card-details.page.html and copy in the following code:
<ion-header no-border>
  <ion-toolbar color="secondary">
    <ion-buttons slot="start">
      <ion-button (click)="delete()">
        <ion-icon slot="icon-only" name="trash"></ion-icon>
      </ion-button>
    </ion-buttons>
    <ion-title>Card</ion-title>
    <ion-buttons slot="end">
      <ion-button (click)="save()">
        <ion-icon slot="icon-only" name="checkmark-circle-outline"></ion-icon>
      </ion-button>
    </ion-buttons>
  </ion-toolbar>
</ion-header>

<ion-content>
  <ion-card padding>
    <ion-item>
      <ion-label position="stacked">Question</ion-label>
      <ion-textarea rows="5" [(ngModel)]="card.question"></ion-textarea>
    </ion-item>
  </ion-card>

  <ion-card padding>
    <ion-item>
      <ion-label position="stacked">Answer</ion-label>
      <ion-textarea rows="10" [(ngModel)]="card.answer"></ion-textarea>
    </ion-item>
  </ion-card>
</ion-content>
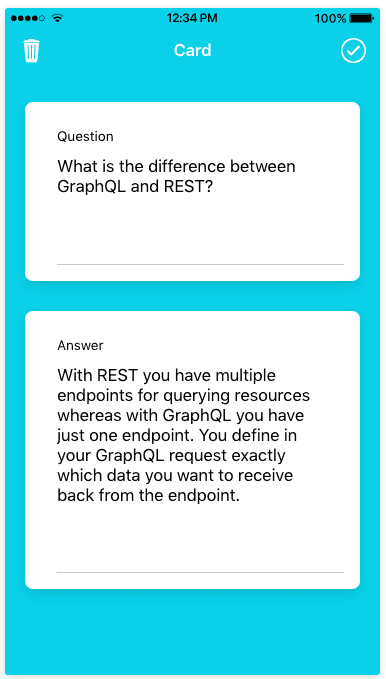
We're displaying the question and the answer for the card on this page. It has buttons in the header to delete and to save (add or update) the card details, but they're not doing anything right now, just closing the modal. We'll look at using GraphQL mutations in the next part of this tutorial.
Go to src/pages/card-details/card-details.page.ts and copy in the following code:
import { Component, OnInit } from "@angular/core";
import { ModalController, NavParams } from "@ionic/angular";
import { API, graphqlOperation } from "aws-amplify";

const getAnswer = `
query getAnswer($id: ID!) {
  getCard(id: $id) {
    answer
  }
}
`;

@Component({
  selector: "app-card-details",
  templateUrl: "./card-details.page.html",
  styleUrls: ["./card-details.page.scss"]
})
export class CardDetailsPage implements OnInit {
  public card;
  public deck;
  public isNew = false;

  constructor(
    private modalController: ModalController,
    private navParams: NavParams
  ) {}

  ngOnInit() {
    this.deck = this.navParams.get("deck");
    const card = this.navParams.get("card");

    if (!card) {
      this.isNew = true;
      this.card = {};
    } else {
      this.card = Object.assign({}, card);

      const query = API.graphql(
        graphqlOperation(getAnswer, { id: this.card.id })
      ) as Promise<any>;

      query.then(res => {
        this.card.answer = res.data.getCard.answer;
      });
    }
  }

  delete() {
    this.modalController.dismiss();
  }

  save() {
    this.modalController.dismiss();
  }
}
Since we didn't fetch the answer on the previous page, we'll have to use another GraphQL query to get it here.
Obviously if your app is dealing with very little data, it might make more sense to just get everything up front and pass the data to the different pages, but I've done it this way for the tutorial to show you that you have full control of which data you want to get per page.
Quiz Page
I'm going to leave the Quiz Page for the next part of this tutorial in which we will also implement the create/update/delete GraphQL mutations for this app.
Questions?
Leave a comment below if you have questions!
For more info on the frameworks/libraries we're using in this tutorial, here are links to the Docs:
Ionic 4 Beta Docs
Amplify Docs
Angular Docs


